github pages
Publishing static content online with github pages
Perhaps read these first
You may find it helpful to read the following pages before this one.
- html
Github offers a simple way to publish websites called “github pages”.
There are some limitations of github pages, but for simple pages involving only basic HTML, or HTML/CSS/JavaScript, it is a good way to get started and get your content on the web.
Here are the basic instructions for getting a simple web page online with github pages. After this overview, there is more detail about each step.
- Create a (free) github.com account.
- Create a repository.
- You only need to give it a name, and click the button for “Initialize this repository with a README”.
- For everything else, the defaults are fine (public, “Add .gitignore: None”, and “Add a license: None”).
- Choose the name carefully, since the url for your website will be of the form
username.github.io/repo-name.
- Create or upload your content:
- Create an index.html file to be the home page for the site.
- HTML, CSS and JavaScript files are supported.
- Server side code (e.g. PHP, Python, Perl, Ruby) is not.
- Publish your web page.
- View your webpage at username.github.io/repo-name
Create a free github.com account
Visit http://github.com and create an account on the free plan.
Choose your username wisely, since it will be part of your professional identity as a coder. Potential employers often look at your github.com repos to see examples of your coding work. You may find it better to choose something like jklopez4 rather than coolskaaterkid23 or iceskreemfan.
Create a repository
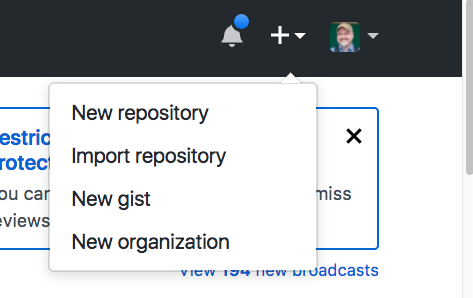
To create a repository, you need to be logged in to your account at the page http://github.com. Go to the upper right hand corner of the page, and click the + sign, to bring down the “create” menu, as shown below. Select “New repository”.
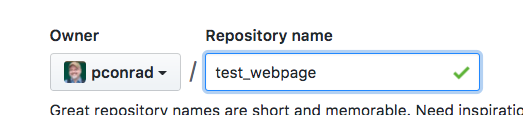
Once you select New repository, you should see a screen like this one:

Fill in the name:
Click the box that says “Initialize this repository with a README”:
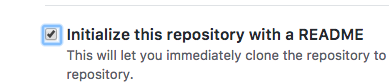
And then click the Create repository button:

Create or upload your content
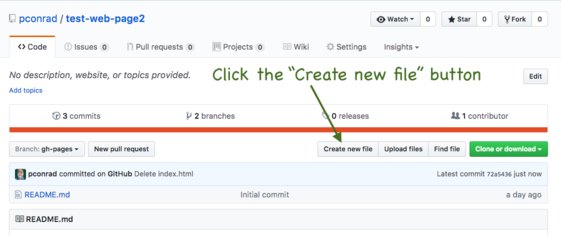
You should now be at the main page of the repo. It will have a URL of the form http://github.com/your-user-name/your-repo-name
You can create an index.html file right in the browser by clicking the “Create new file” button as shown here:
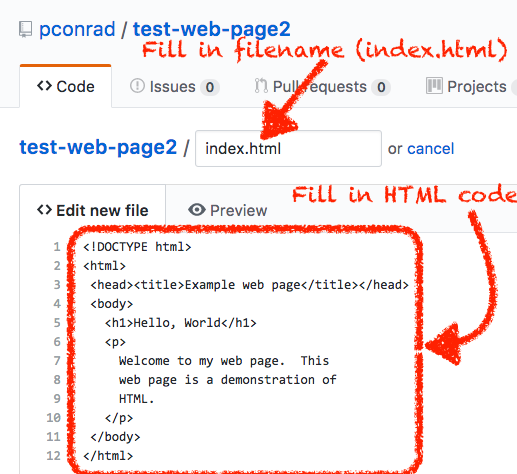
After clicking this button, you’ll see that you can enter text for a new file. Give the file the name index.html, and type in some HTML code for a simple web page. You can find some on the topic page .
Here’s an image of what that would look like:
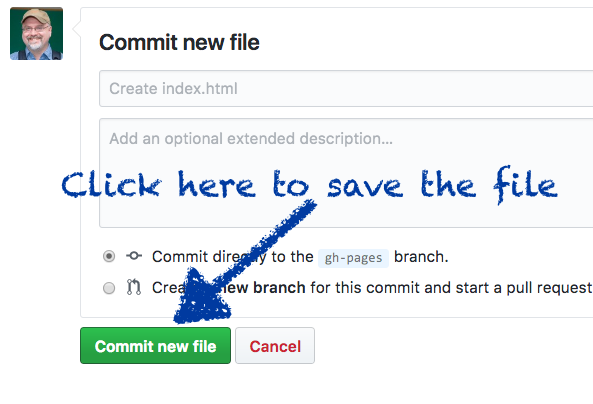
After entering the name index.html and some HTML content, to save the file, you’ll need to scroll down to find the Commit button. Saving a file in github involves “committing” it to the repository. The commit button is the green one in this image:
Publish your web page
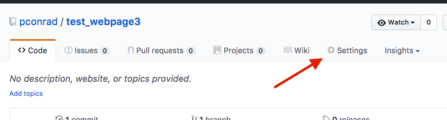
To publish your web page, you want to go to the Settings menu for the repo you created.
- Note that github has a Settings menu for your account, as well as a Settings menu for each repo you create.
- To get to the proper Settings menu, follow the instructions below.
Naviate to the main page for your repo. It will have a URL of the form http://github.com/your-user-name/your-repo-name
On that page, you should see a link to a menu for Settings as shown here. Click on that link.
That will take you to a page with a URL of the form http://github.com/your-user-name/your-repo-name/settings In the left menu, click on ‘Pages.’ This will take you to the GitHub Pages page.
On the GitHub Pages page, you will see a drop down menu in the Source subsection. Select main in this drop down menu. Then click save.
Viewing your webpage at username.github.io/repo-name
As long as you have:
- a username (e.g. jklopez)
- a repo name (e.g. mypage)
- an index.html file in the top directory level of your repo on the gh-pages branch
then you should be able to see the webpage at, for example, http://jklopez.github.io/mypage
If you add additional files, they would be found at similar URLs:
foo.htmlwould be at http://jklopez.github.io/mypage/foo.htmlbar.htmlwould be at http://jklopez.github.io/mypage/bar.html- If you create a folder baz, and put index.html into it, then that content will appear at http://jklopez.github.io/mypage/baz
Now we are going to add a link to your webpage to your README file. Click on README.md Then clikc on the pencil icon in the upper right hand corner to edit the file. The first line of your README file should be “# test_webpage”. On the next line, type the link to your webpage, starting with “http://”.
Now scroll down and click “Commit changes”. You should now see the link to your webpage in your README. Click on it to make sure that it works.